How to make Great Compost
Posted on July 7, 2021 by WormBiz
There are many tools and methods to processing natural waste materials into this very powerful additive for your soil.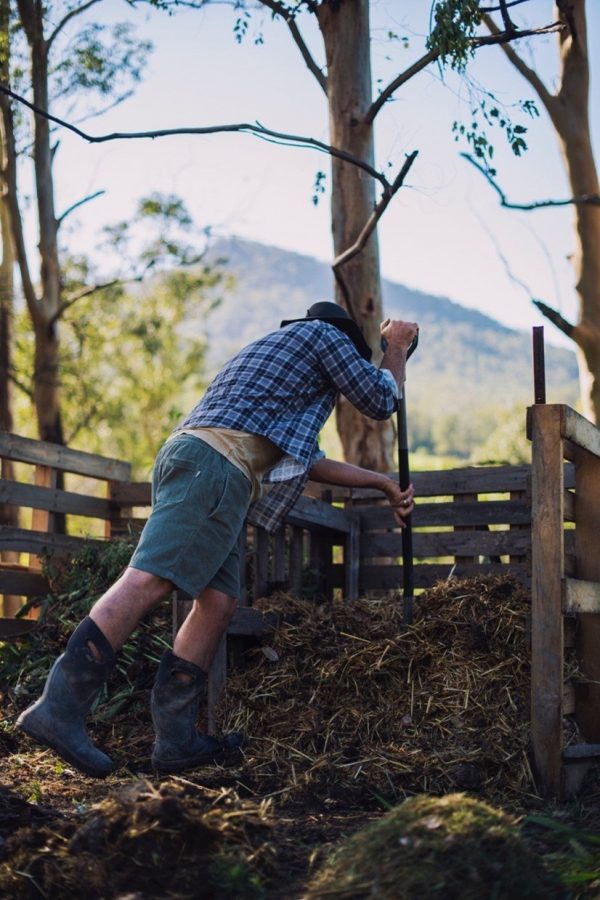
Successful composting is all about the right balance of ingredients and managing the right conditions for organic matter to decompose and return to the soil, just as they do in nature. There are lots of ways you can make compost at home from natural waste materials, depending on your chosen method, volume and how quickly you would like to achieve the finished result. Making compost can be quite labour intensive and time consuming or fairly simple. Finished compost is dark and rich in colour with a pleasant, earthy smell and is easily applied to the garden by working it through the soil or blending through seed-raising or potting mixes. Regardless of your living space there are a variety of options to enable you to easily compost at home.
Composting is all about creating the right balance of ingredients and conditions.
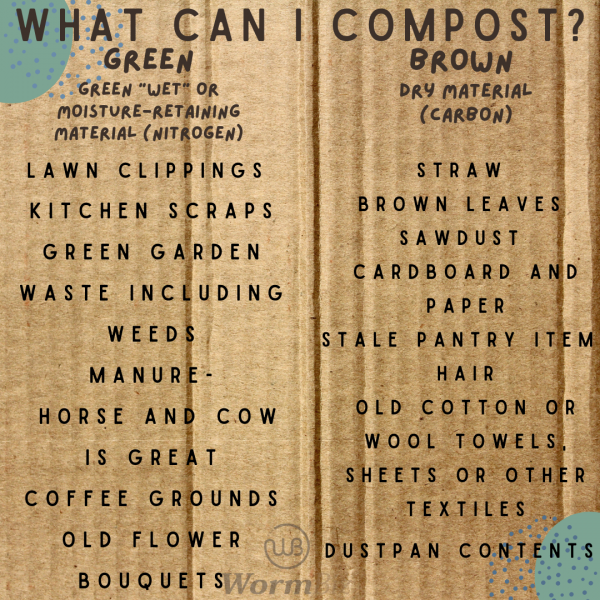
Carbon includes brown or dry materials,
Nitrogen includes green or moisture retaining materials,
Oxygen or aeration aids the decomposition process and can be achieved by turning, forking or tumbling,
Moisture in the right amounts to maintain activity without being too wet and causing anaerobic (no air) conditions,
Bacteria and Fungi help break down material and help to decompose woody material.
With the right mixture of carbon, nitrogen (50/50 ratio), oxygen and moisture, bacteria and fungi micro-organisms are activated, creating high heat which speeds up the decomposition process from organic matter into compost. Active management of the pile through turning (aerating) and the right amount of moisture is required to maintain a high temperature until the materials are all broken down.
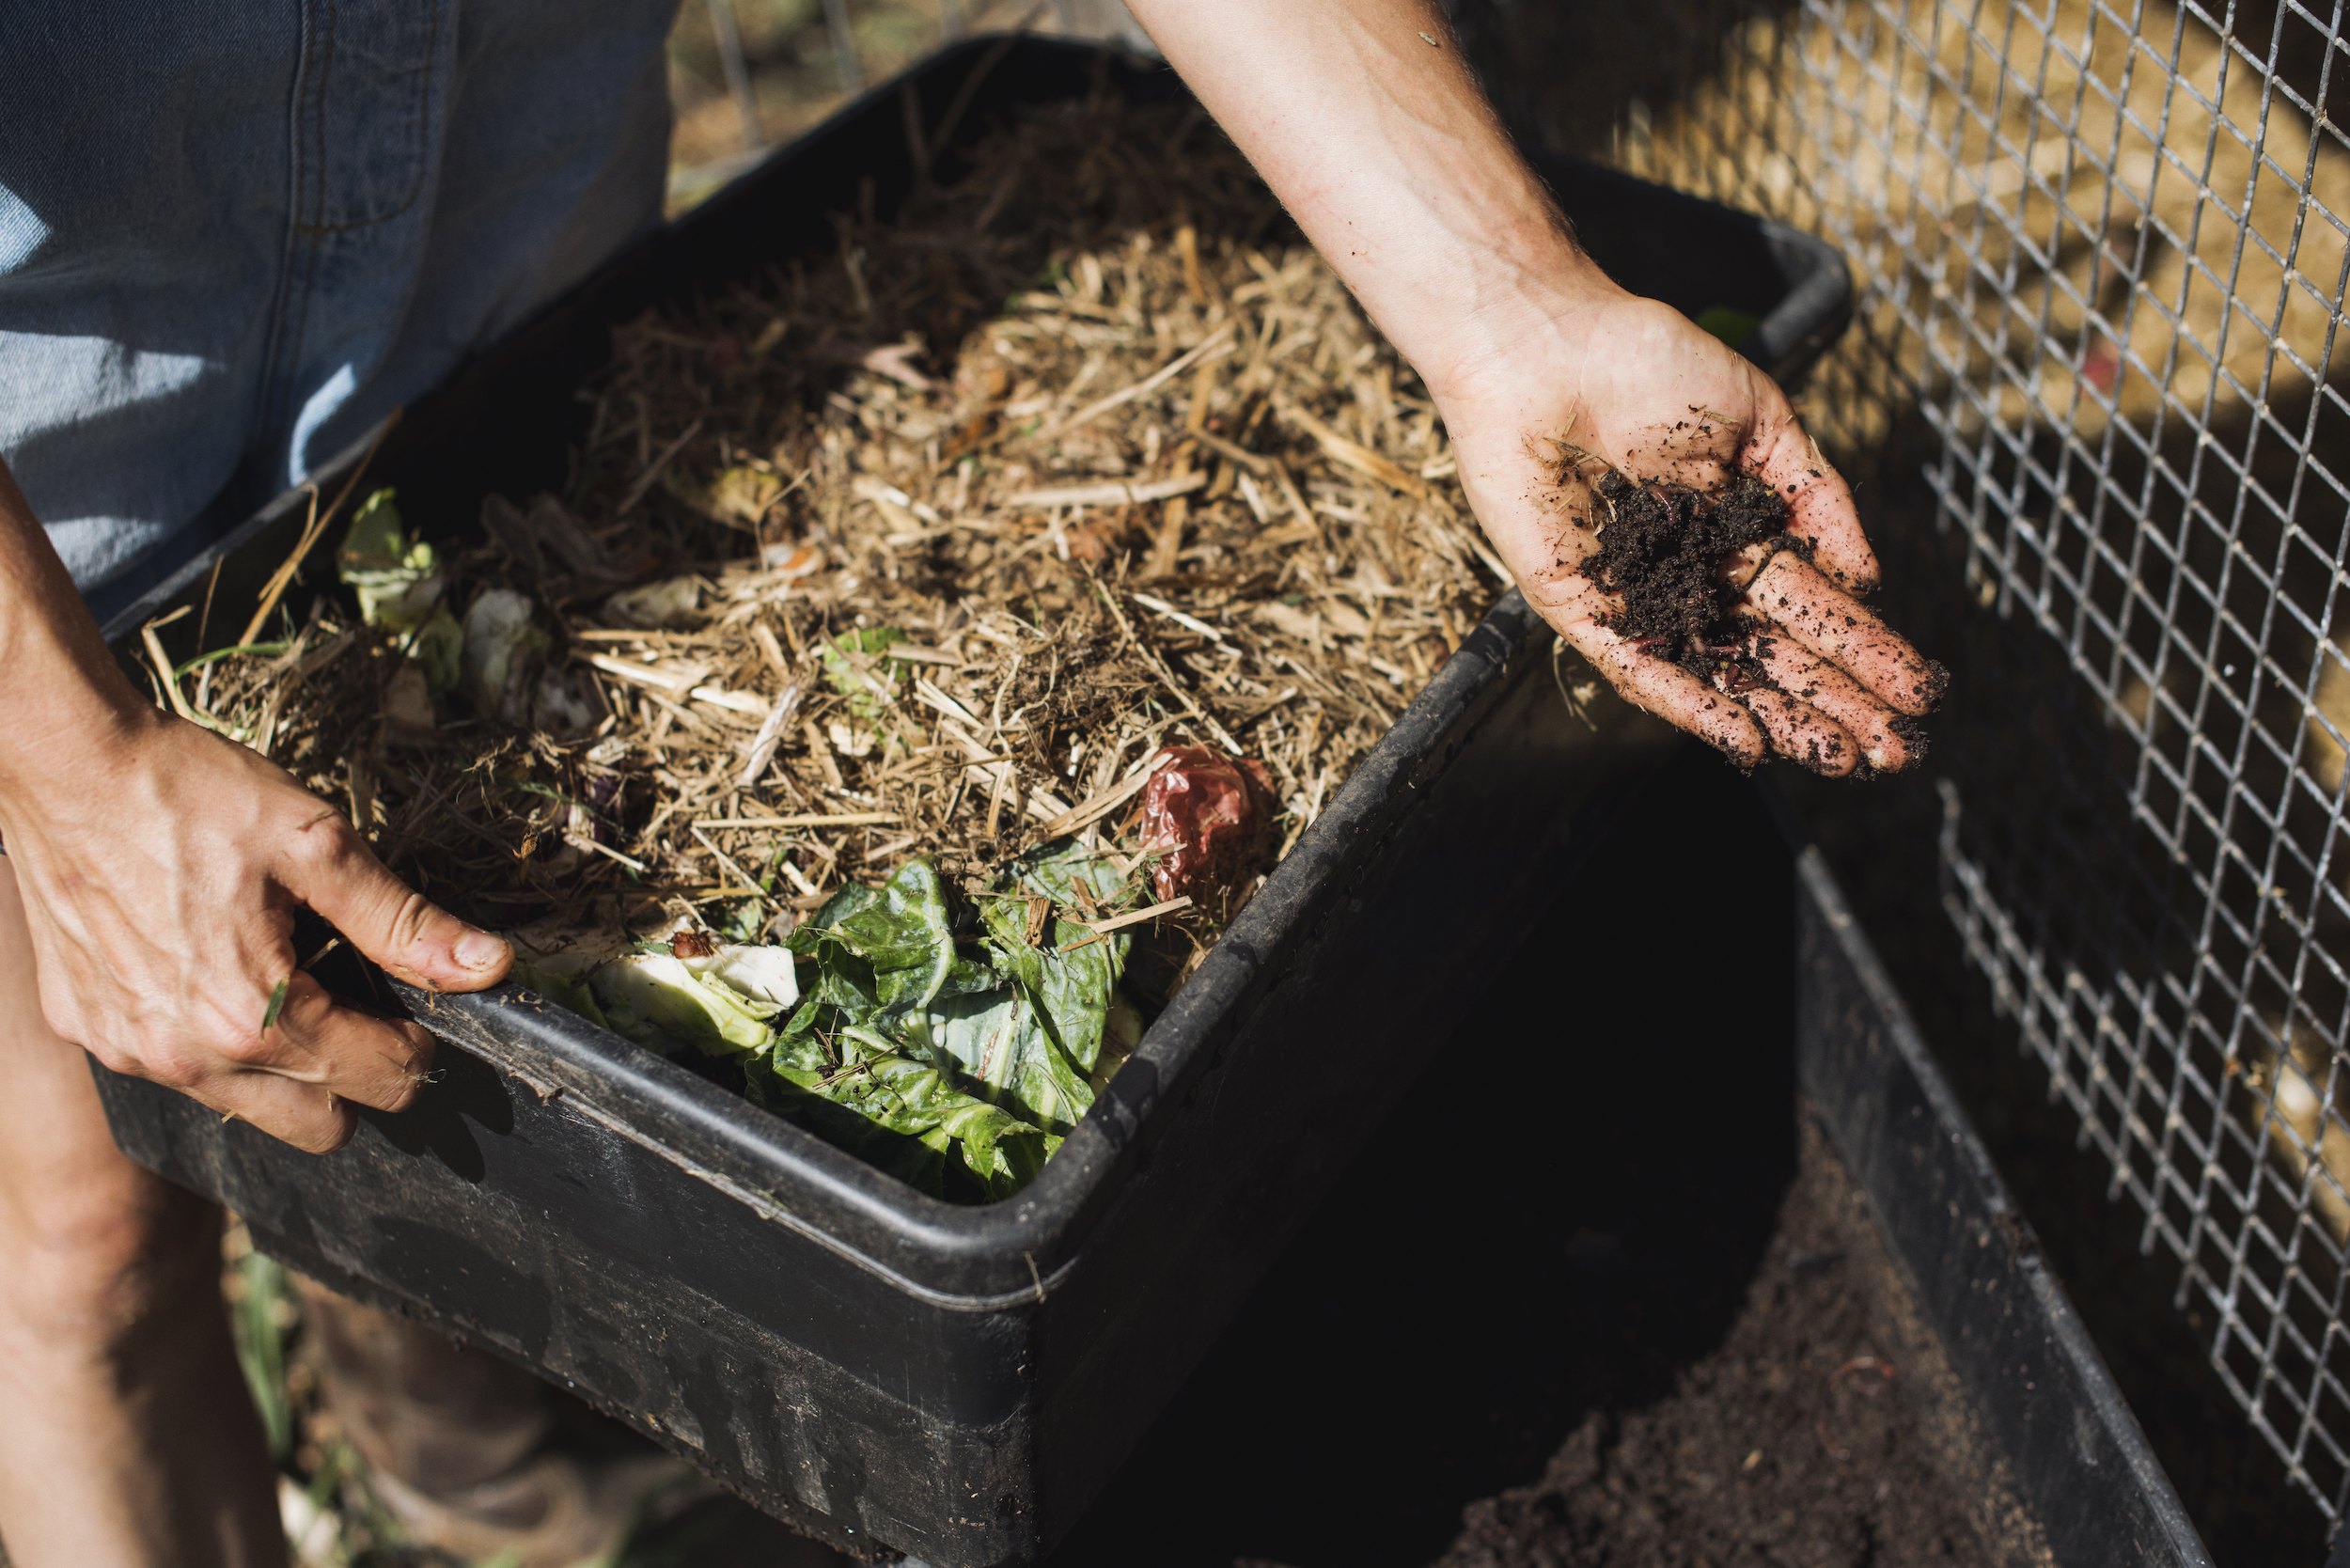
The squeeze test for moisture
A good gauge for adequate moisture is to squeeze a handful of material. You should see water well up around your fingers but not really run off; more drip, similar to a damp sponge. If too moist and soggy, incorporating more carbon (brown) material will help to rebalance. If too dry, add water for moisture.
What can I compost?
There is a long list of items suitable for the compost, the general rule is if it came from a natural source, it is suitable for composting. A 50/50 ratio of carbon and nitrogen, with adequate aeration achieved by turning and the appropriate amount of moisture, dependent on the method you are using.
Some methods to make great compost include:
Thermolytic Compost (Hot method)
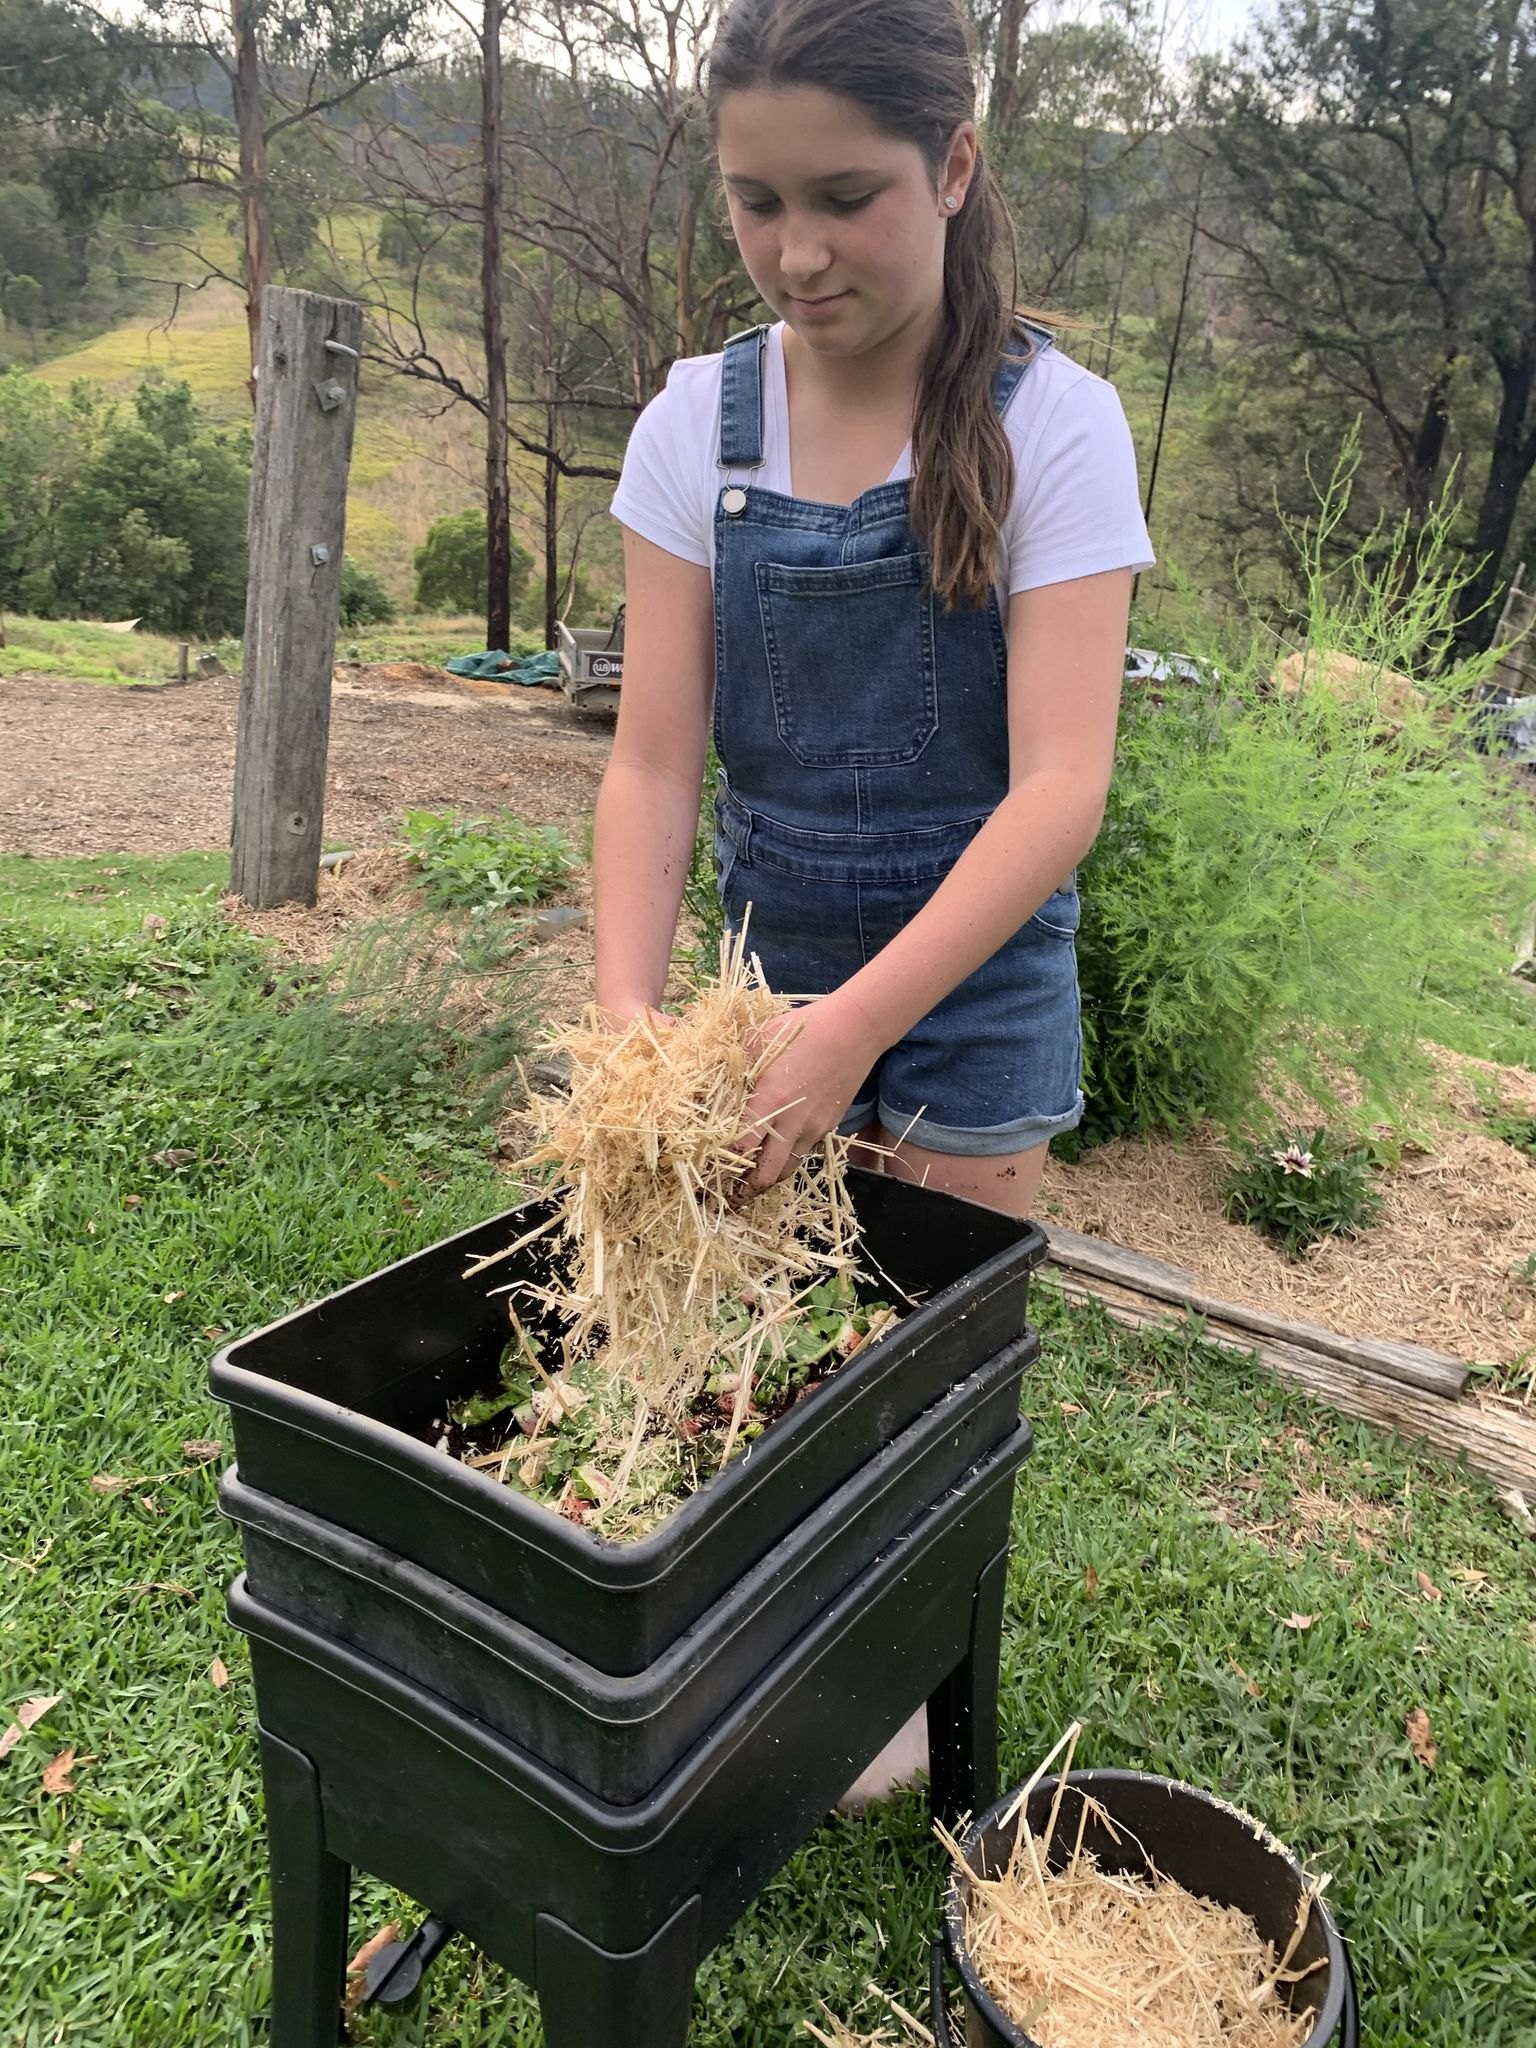
A compost heap or bay is a very effective way of processing larger amounts of green waste and/or including food waste materials and therefore creating a larger volume of finished compost. Perhaps you might only make a heap a couple of times per year by gathering a large amount of compostable materials. We like to do a heap pile timed at the end of a growing season, as that way we can use all our garden pruning’s and leftovers in addition to timing this with the cleaning out of our soiled animal enclosure bedding. You will require outdoor ground space of at least 1 metre square; old pallets make for a great compost bay and help to keep the heap contained and heaped to an ideal size of 1 cubic metre which helps sustain heat the whole way through the process. Choose a site close to your garden with good drainage and summer shade. Create layers with your materials a bit like a lasagna, remembering the 50/50 greens to browns rule. Turning for aeration is best achieved with a compost fork and added moisture as required. Remember, a good gauge for adequate moisture is to squeeze a handful of material; you should see water well up around your fingers but not really run off, it should more drip, similar to a damp sponge. If too moist and soggy incorporating more carbon (brown) material will help to rebalance. If too dry, add water for moisture. The process will take around 6 weeks, finished compost is dark in colour and smells earthy. There may still be larger materials present in your pile. Sift these out or use as is.
Composting in situ (Cold method)
This method is about intentionally composting to build soil in an area you intend on being productive in the future. The advantage of this method is the low labour input although composting in situ is a slow or “cold” decomposition process. Using a variety of drag and dump materials is best including woody debris, pruning’s and other green waste materials, as this will ultimately bring in a diverse range of organisms to break down the pile over an estimated period of about a year. Composting in situ doesn’t require added moisture as such, however a hose every now and again in dry periods will help to speed up the process. It is important to note with this method that any weed seeds present won’t get sterilised like in a hot compost, therefore it is possible for the pile to reshoot unwanted vegetation. If this occurs, the new vegetative growth can be pulled out before harvesting the finished soil from underneath the pile.
Compost bin
Compost bins are a great way to compost garden green waste and food waste materials. There are lots on the market and also plenty of DIY options, however they all work in a similar manner. Compost bins are a large vessel slightly dug into the ground with an opening at the top and a lid. Organic waste materials are deposited via the opening at the top. Compost bins are generally low maintenance, although you do have to turn the contents over with a shovel or compost turner regularly to maintain aeration and add moisture as required. Once the composting process has completed the bin is lifted up and the compost is harvested.
Compost tumbler
Rotating compost bins are a user-friendly way to make small batches of compost from garden and food waste materials in a fairly fast time, due to adequate aeration and rotation. Compost tumblers vary in size and shape, but they all work in much the same way. The compost process time is reduced due to the ability to mix your compost easily and thoroughly. Rotating compost bins allow for adjustable airflow which is great to monitor oxygen control. Look for a tumbler with dual chambers to allow for continuous composting. One side can be processing while the other side is available to deposit further waste materials. Emptying is easy by opening the chamber and turning upside down to collect.
Solar composting
A solar composter or digester sometimes known as a “green cone” is maintenance-free, no turning or moisture required. A great solution to dispose for all household organic waste including meat, dairy and even pet waste. Green garden waste is not recommended as it takes up too much room and clogs the system. The cone is positioned in the garden and buried about 40 cm into the ground. Waste is deposited through the opening at the top before closing the lid. It is a simple, low-maintenance composting unit into which you can throw all household organic waste for it to return itself to the soil. It doesn’t produce a compost that can be harvested and utilised elsewhere but does break down waste material until it becomes rich liquid, which then filters safely into the surrounding soil.
Bokashi Bin
Bokashi is a Japanese term meaning – “Fermented organic matter”
A bokashi benchtop or under-sink bucket style system is a great option for apartment dwellers or anyone with minimal space and time that doesn’t have an alternative solution for diverting their food waste from landfill. This system is effective at breaking down kitchen waste material and allows you to deposit almost all of your scraps inside, turning them into a liquid fertiliser and eventually compost once buried in the soil. The process can be a bit icky until you get the right balance and routine. The scraps deposited in the bin first go through the process of fermentation. This is achieved and accelerated by introducing a specific store-bought beneficial bacterium. Each time scraps are added to the bin the new layer is sprayed with the accelerant or grains to be applied over the top. Fermented food waste is good organic matter with high nutrient content and will eventually be buried into the soil where it will complete the composting process. Along the way the fermented juice can be collected via the specific tap featured by the bucket. When diluted this “juice” is a rich fertiliser for indoor and outdoor plants or can be safety poured down the drain which is an excellent drain cleaner. A bokashi bin is best kept inside but can be housed outside if kept in full shade out of direct sunlight.
How do you use a bokashi bin?
A bokashi bin is fairly easy to use once you get into the swing of it! You can purchase different size buckets depending on the volume of your kitchen waste stream. Bokashi buckets are mostly plastic with a lid, a grate at the bottom of the bin to separate the juice and a tap to drain liquid easily. The bucket is best kept indoors, however can be left out if in a shaded protected position with the lid firmly closed to prevent undesirable pests and insects.
The process goes a little something like this
Open the bin lid and deposit food waste material. You can put almost all food waste inside except large bones, liquids and already moldy food.
Spray or sprinkle bokashi mix (grains) over each waste deposit. For every cup of food waste, it is around 1 tablespoon of mix or 3-5 sprays of accelerant.
It is important to eliminate air pockets within the waste layers and so it is recommended after each deposit to press material down firmly to remove air bubbles. A potato masher is a great tool for the job! Ensure lid is closed properly and tightly.
Food scraps inside the bin are technically not “composting” but rather going through the process of fermentation which creates “Bokashi juice”. This liquid is full of beneficial plant nutrients and collects at the bottom of the bin after about the first week of use and can easily be emptied via the tap. Drain juice often to enable the material to decompose quicker. The bokashi juice will be orange in colour and smell like vinegar. It will have white fungal threads floating in it or have a thin white coating. Putrid smelling juice should not be used to fertilise plants, and it is best to dispose of this juice by pouring it down the drain. The bokashi bucket will need to be regularly drained, usually every few days, however more liquid will be generated in warmer weather. Diluted juice can be used to fertilise indoor, outdoor and potted plants A ratio of two teaspoons of juice for every litre of water. It is best not to store liquid for more than 1-2 days as it can quickly turn rancid. You can also add the juice to your compost pile or safely dispose of the juice undiluted down the drain, where the beneficial bacteria will act as natural drain cleaner.
Repeat this process until the bokashi bin is full. Once full, it is best to let it continue to ferment for another 1-2 weeks before burying. Having two bokashi bins allows the user to start a new bin for food waste collection right away while the first bucket is finalising before its contents are finally disposed of by burying in the soil.
Wash your bokashi bucket out after each use using a natural cleaner or plain water. Harsh chemical cleaners are not recommended.
How do you bury the material?
There are a few options available when it comes to burying the bokashi bin waste. The first is to dig a hole in your garden about 25-30 cm deep, the deeper the better. The compost is acidic when it is first buried but neutralises after 7-10 days. It is best to wait 2 weeks before planting anything in the same location. In an established garden, dig around plants, keeping away from the roots of young plants. Tip the waste in the hole and cover it up with soil.
If you don’t have any garden, the contents of your bokashi bin can be buried in a large tub of soil. This will turn into compost which can be used to nourish pot plants or could be offered to friends, family or neighbours for their gardens. Alternatively, some councils have regular organic waste pick-up, so get in touch with your local council to find out what their solution is! Community gardens may also offer bokashi waste drop off.
It is definitely worth mentioning, if none of the organic waste home processing options are right for you, do some investigation to find out who might be interested in your unprocessed waste. For example, perhaps you could drop off your food waste to the local community garden for composting. A good option strategy would be to freeze until viable to make the trip.
What can I put in a bokashi bin? Any organic waste materials cooked or raw, such as meat, dairy, vegetables, fruit, meal scrapings, breads, coffee grounds, and compostable tea bags.
What not to include? Food that is already rotten, plastic bottles, plastic wrapping, glass or any other non-compostable materials.
Source: Home Grown Health, Anna Axisa.
Available for pre-order soon!
Join the Home Grown Healthy Living Facebook group to stay up to date!